Drywall Repair Las Vegas is pretty tough stuff, but it’s not indestructible. A popped nail or screw, run-ins with the vacuum cleaner, or kids flinging toys can all damage it.
Fortunately, most of these minor blemishes can be fixed with drywall compound and paper tape in just a few steps. The trick is to properly prep the damaged area before starting.
Drywall corners are subjected to a lot of abuse. Moving furniture, roughhousing and just everyday use can cause dents or even small holes in the corners of walls. These blemishes are easy enough for most do-it-yourselfers to repair and touch up with paint. As the damage gets bigger, however, it’s time to consider a more involved fix.
The simplest type of corner damage involves cracks in the joint where the drywall meets itself. These are often caused by normal settling of the house frame and can be fixed with a few simple steps. First, sand the crack smooth and then apply a coat of joint compound to both sides of the seam. After it dries, apply another coat and then sand again until smooth. Then, if needed, add a coat of primer and then two topcoats of paint.
Small cracks, dents and scratches can also be fixed with a bit of sanding and a dab of drywall spackle. Once the sanding and patching are complete, the area should be wiped down with a damp cloth to remove any dust or debris that remains.
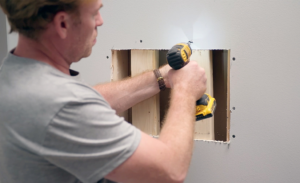
Larger dents and holes in drywall require a little more work. The best way to fix these is by replacing the damaged section of drywall. To do this, you’ll need a utility knife and a stud finder to locate the nearest stud on either side of the hole. Using a carpenter’s square, mark the area you plan to cut out of the existing drywall. This should extend an inch above and below the hole, as well as between the centers of the studs on each side of the repair area.
When the new piece of drywall is cut out, position it in place and nail it to the studs through the flanges on the edges. If the flanges are loosened, it’s a good idea to re-nail them with drywall nails that have a thin shank. This will help prevent the stud from twisting and pushing the nail heads back out again over time.
Finally, after the new drywall is in place, use your drywall tape and joint compound to fill the holes and make them as smooth as possible. Be sure to use low-dust joint compound, as it’ll reduce the amount of dust that will be generated by the sanding process. Once the new compound is dry, use a sanding sponge with fine-grit sandpaper to further smooth and blend it with the surrounding wall.
Repairing Larger Sections of Drywall
While a few small holes or cracks in the wall might be easy for a stubborn DIYer to repair, what about a bigger project that requires cutting into current drywall and potentially having to replace the entire section of sheetrock? In most cases, these larger repairs require a professional.
Drywall work is more complicated than most people realize, and if it isn’t done correctly, the damage will show through when it comes time to repaint. Small blemishes like nail holes and dents can be easily touched up with a dab of paint that blends into the existing color, but as the size of the repair grows, it becomes harder to make the patch look seamless. In addition, if your walls are textured, the drywall patch will stand out and be noticeable.
If you have to cut into a large area of your wall, start by marking the location where you will be making your cuts. This will help you avoid accidentally cutting into electrical wires, plumbing or anything else that could be dangerous. Before you begin, make sure to turn off any power to the room in which you are working, and wear rubber gloves to protect your hands.
When you are ready to begin, cut out a piece of replacement drywall that is the same shape as the hole or crack that you need to repair. This can be accomplished using a utility knife. Then, use your pencil to trace the outline of the area you need to fill in on your new drywall. When you are finished, it’s a good idea to use your utility knife again to clean up any rough edges on the new drywall patch.
The next step is to tape the seams between your newly installed patch and the existing drywall. This is essential to ensuring that your drywall repair job will last. Use a roll of standard paper tape, or mesh tape for larger holes and cracks. Then, apply a layer of drywall compound with your drywall knife, and let it dry overnight.
Now that the seams are taped, you can sand them down with your sanding block or power sander. Once you have them completely smooth, it is a good idea to prime the entire surface of your drywall repair. Once the primer has dried, you can paint it with your preferred color.
Repairing Holes in the Wall
If the drywall has sustained severe damage, it will likely need to be replaced instead of simply patched. In most cases, however, a hole in the wall can be easily repaired with a drywall patch kit and some joint compound. First, be sure to clean the area around the hole with a vacuum or broom. This will ensure that the new material adheres to a clean surface. Next, wet the hole lightly with a spray bottle. This will help to soften any hardened mud and make it easier to remove with your putty knife. Once you’ve removed any loose materials, wipe the wall down with a damp sponge to prepare it for the drywall patch.
Once the hole is filled, apply two coats of joint compound to the entire area, including the edges of the patch. Once the second coat is dry, sand the patch until it’s smooth and even with the rest of the wall.
Now you’ll need to decide if you want to repaint the patched section or the whole wall. It’s important that you prime the patch before you paint, as unprimed compound will absorb the sheen and color of your new paint.
It’s also important to choose the right type of drywall for your home. Different drywall options have different properties, such as sound resistance and fire retardation. The best option for your home will depend on the type of use the room will have, as well as your budget.
One of the most common problems that homeowners encounter is a nail pop or other hole in the wall. This can happen from a number of causes, such as running the vacuum cleaner over a corner or a child flinging a toy against the wall.
The good news is that this is a relatively simple repair, and most people can do it themselves with the right tools. It’s a great way to save money on repairs and learn some new DIY skills!
Regardless of the size of the hole, it’s essential to identify the location of the stud in the wall before you begin working. Utilities, such as electrical wiring and plumbing, run along the studs, so you don’t want to accidentally cut into them. Also, if the wall is textured, you’ll need to match that texture to the surrounding area to make the repair undetectable.
Repairing Cracks in the Wall
While a small crack in the wall might seem like a minor issue, it could be a sign of a more serious structural problem. If you notice cracks in the walls of your home, it is a good idea to consult a professional as soon as possible. Cracks in the walls are usually caused by issues such as water leakage, settling of the house, and even problems with the foundation.
When you are repairing a crack in the wall, you will first need to widen the crack. This will help to ensure that any gap filler or sealant will be able to properly fill the crack, and it will also make sure that the crack will not come back in the future.
To do this, simply use a putty knife to scrape away any loose material from the surface of the wall. Once the area is clean, apply a thin coat of joint compound to the cracked area. Apply a second coat of joint compound to the area, and then sand it down once again. Once the sanding is done, you can feather the edges of the patch into the surrounding wall material to create a seamless finish.
You can also purchase a drywall patch kit, which will contain a pre-cut drywall patch that can be easily applied to the damaged area. This is a great option for those who are not experienced at using a putty knife, and it will give you a much more professional-looking result.
The final step in repairing a crack in the wall is to sand down the area once again to ensure that it is smooth and free of any rough areas. This will help to make the finished repair look as seamless and natural as possible, and it will also ensure that any paint or other finishing touches will be able to adhere to the surface.
There are many different methods for repairing holes and cracks in the wall, so it is important to find the method that is best suited to your needs. For smaller dents and cracks, it is generally best to use spackle or joint compound, while larger cracks and dents are often better fixed using mesh tape or mud.